Say that blog title 3 times fast!
This post is about a little DIY project that was small but mighty. During one of our frequent trips to Home Depot I snatched up the latest issue of Better Homes and Garden's "100 Decorating Ideas." I really love their special editions and succumb to paying nearly $6 a pop for them. With every issue there are things I like and others I could do without. However, this certain magazine had an article with a project I just had to try!
You know how many people are digging those 3D white flowers right now? Well I've liked them for awhile, even before
YHL wrote about them and hung them in their guest bedroom. The way John and Sherry placed them was very similar to my plans for them, too!
I've always hesitated on buying them for some odd reason and I guess now I know why!
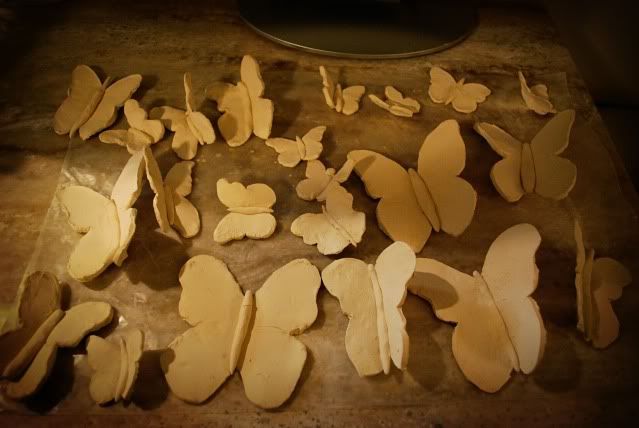
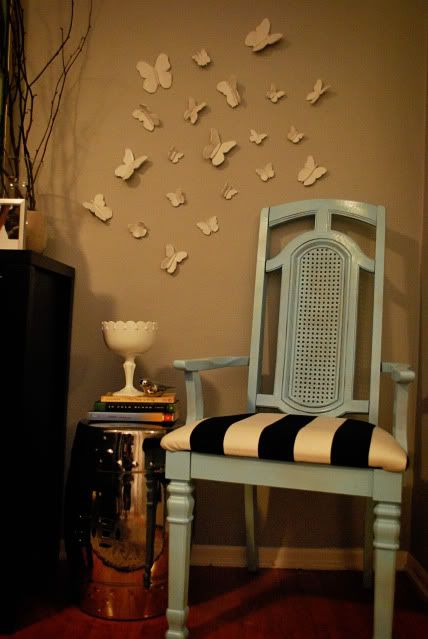
Because of this article in the magazine, I was inspired to make my own 3D wall art in the shape of butterflies! All it took was a couple of cheapie supplies {wax paper,rolling pin, razor blade, white clay, spray paint, butterfly inspiration art, foam stickies},a patient hand, and some serious practice makes perfect.
At first I tried to cut the butterflies free-handed, but was quickly reminded that I am nowhere near a good artist. So I turned to the ever-so-handy google images, found a couple different shapes and sizes of butterfly clip art, printed 'em out, and used them as my tracing patterns for the rest.
I'd like to say I had a number or a design in my head, but really, I didn't. I made about as many as I could before I was sick of rolling out the Crayola clay that looked like yummy sugar cookie batter.
Once they were all shaped and formed, I let them dry for a couple of hours since the cheapie clay I bought had strict instructions NOT to bake it.
On about the end of the second day of drying I took them out back and spray painted them white with my favorite Krylon spray paint.
Tonight after our master's class we stopped by Michael's and picked up some foam double sided stickies to adhere to both the butterflies and the wall. We bought the magnets that you see in the pic, but they were more expensive and not nearly as effective!
I was hesitant at first to stick them on the wall, but let me tell you, with all the mistakes I made arranging and rearranging, that stuff comes right off. It is exactly similar to those no-mess 3m hooks that cost a fortune!
Before I put them on the wall all willy-nilly, I did take a picture of a layout I liked and referred back to it as I placed them on the wall, making some minor tweaks here and there.

It took about an hour to hang all of them because I would hang one, step back and look, hang another, then crack one {oops!}. When a crack occurred, I solved it super quick with clear liquid nails. There's no job too big or small for that stuff! I'm happy to say that only one butterfly was beyond repair after I cracked it!
And, finally, the finished product both far and close.
Hope you enjoyed my little DIY wall art fun!
xoxo
{Stay tuned for a post on those fun ceiling medallions!}